Step-by-step Windows guide to install OpenClaw, fix common errors, and run it 24/7 with PM2, Scheduled Tasks, or cloud/VPS hosting.
Want to run OpenClaw on Windows without interruptions? This guide covers everything you need to install and operate OpenClaw — a Node.js-powered AI assistant — on Windows and keep it running continuously. OpenClaw connects messaging platforms like WhatsApp and Telegram to AI agents for task automation, browser control, calendar management, and more.
Here’s what you’ll learn:
Install the required tools. Download Node.js, Git, and the WebView2 Runtime for Windows.
Run the one-line installer. A single PowerShell command sets up everything automatically.
Keep it running 24/7. Configure power settings, use PM2, or set up a Windows Scheduled Task for uninterrupted operation.
Three deployment options at a glance:
Local Windows PC — easy to set up but vulnerable to sleep mode and power outages.
Linux VPS — reliable 24/7 uptime, but requires Linux knowledge.
Windows Cloud Desktop — combines reliability with a familiar interface, starting at $29/month.
Quick tip: For local setups, disable sleep mode and use a UPS for backup power. For long-term reliability, a VPS or Windows cloud desktop is the better choice.
System Requirements and What You Need Before You Start
Before diving into the installation, make sure your system meets OpenClaw’s requirements. OpenClaw supports Windows 10 (version 20H2 or later) and Windows 11, and requires a 64-bit processor — either x64 (Intel/AMD) or ARM64 (Surface Pro X, Snapdragon laptops).
The Windows Hub companion app depends on the WebView2 Runtime. While this runtime comes pre-installed on Windows 11, Windows 10 users may need to download the Evergreen Standalone Installer from Microsoft’s website [2]. If you plan to use the WSL2 installation path, enable virtualization in your BIOS settings first [7].
OpenClaw relies on Node.js for its gateway and CLI. Here’s how to set it up:
Visit nodejs.org and download the v24 LTS installer for Windows.
Run the .msi file with default settings. Check the option to “Automatically install the necessary tools” for native module support.
Verify the installation by opening PowerShell and running each command separately:
node --version
npm --version
Both commands should return version numbers. If you plan to install OpenClaw from source or a development channel, also download Git from git-scm.com using the default install options.
Running the OpenClaw Installer and Completing Setup
To install OpenClaw, open PowerShell (Administrator rights are not required for the standard install) and run:
iwr -useb https://openclaw.ai/install.ps1 | iex
This script detects your environment, installs OpenClaw globally via npm, and launches the onboarding wizard. The process typically takes around 2 minutes [4][7]. During setup you’ll configure your messaging platform, add your AI provider credentials, and start the gateway daemon. Once complete, the OpenClaw dashboard opens in your default browser on port 18789.
Confirm everything is running by checking the version and gateway status:
openclaw --version
openclaw gateway status
If both commands return output without errors, the installation is complete.
Fixing Common Installation Errors
Here are the most frequent issues and their fixes:
Execution policy error
PowerShell may block the installer script. Run this once before retrying:
Known bug in older releases. Update OpenClaw to version 2026.2.25 or later to resolve it.
For any lingering issues, run the built-in diagnostic tool:
openclaw doctor --repair
This identifies and resolves common setup problems automatically.
sbb-itb-bea6502
How to Setup OpenClaw on Windows 11 | Step-by-Step Walkthrough (2026)
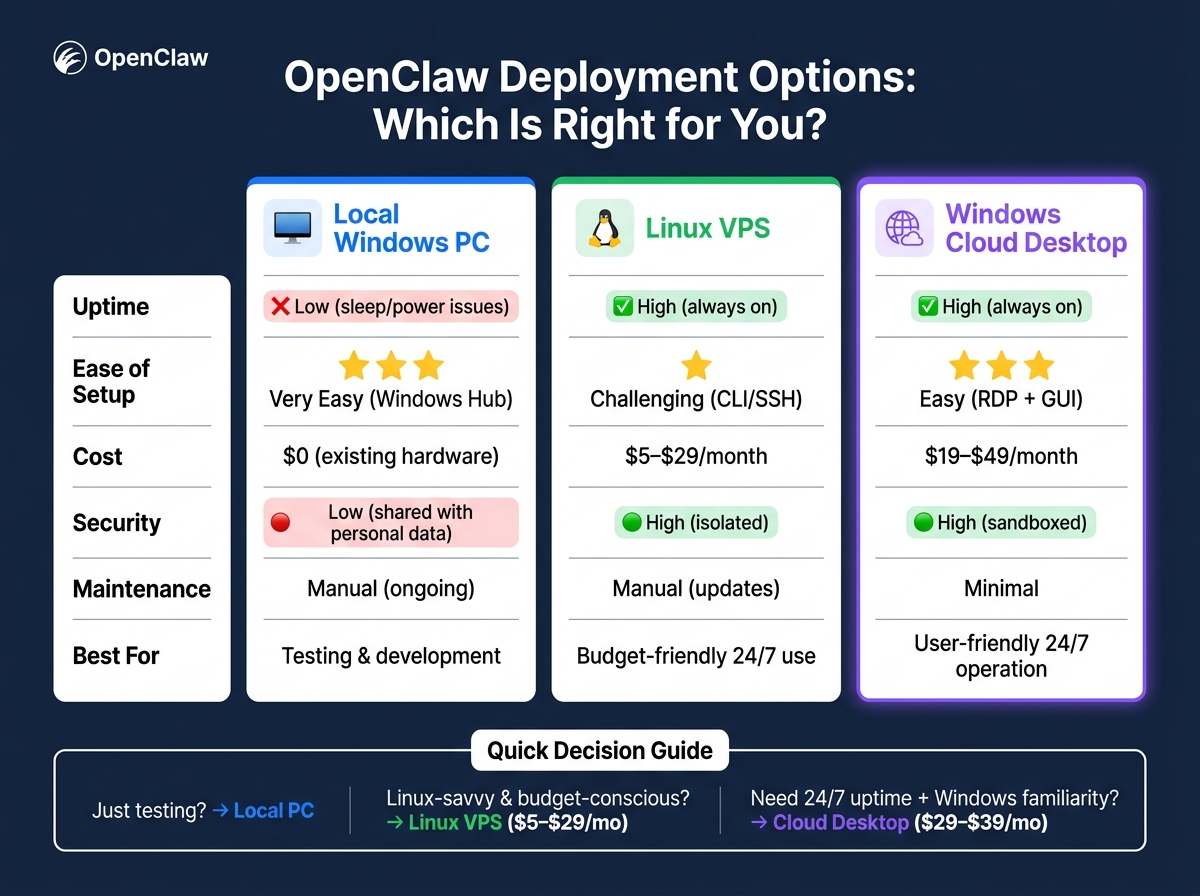
Local PC vs. Linux VPS vs. Windows Cloud Desktop: Which Should You Use?
OpenClaw Deployment Options: Local PC vs Linux VPS vs Windows Cloud Desktop
With OpenClaw installed, the next step is choosing where to run it long-term. There are three main options, each suited to different needs and skill levels.
Local Windows PC: Convenient but Limited
Running OpenClaw on your own Windows PC is the simplest starting point — no extra cost if you already have the hardware, and setup takes minutes. It’s a good fit for testing and short-term automation.
The downside is reliability. Sleep mode, power outages, and simply closing your laptop lid can interrupt the gateway at any moment. Keeping it running requires ongoing tweaks to power settings and task scheduling. There’s also a security angle: running an autonomous AI agent on the same machine you use for personal tasks increases your attack surface.
“Running an autonomous agent on the same computer where you do your banking is a risk most security researchers consider unacceptable.” — Shabnam Katoch, Growth Head, Better Claw [6]
Linux VPS: Reliable but Requires Technical Knowledge
A Linux VPS is the go-to for 24/7 uptime at a low price. Providers like Hetzner, DigitalOcean, and Contabo offer plans from $5 to $29/month. Running OpenClaw on a separate server also keeps your personal data isolated.
The trade-off: you need to be comfortable with SSH, terminal commands, and tools like Docker. It’s cost-effective, but the learning curve is real for anyone new to server management.
Windows Cloud Desktop: Reliable and Familiar
A Windows cloud desktop offers the best of both worlds: continuous availability and a familiar Windows interface you can manage via Remote Desktop (RDP). No Linux knowledge required — just connect and run OpenClaw exactly as you would locally, including the Windows Hub app.
For OpenClaw on flexidesktop, the minimum viable plan is Plan S ($29/month, 2 vCPU, 4 GB RAM, 60 GB SSD) for basic automations. For browser-control workflows, Plan M ($39/month, 3 vCPU, 8 GB RAM) is the recommended fit [6].
Side-by-Side Comparison
Feature
Local Windows PC
Linux VPS
Windows Cloud Desktop
Uptime
Low (sleep/power issues)
High (always on)
High (always on)
Ease of Setup
Very easy (Windows Hub)
Challenging (CLI/SSH)
Easy (RDP + GUI)
Cost
$0 (existing hardware)
$5–$29/month
$29–$49/month
Security
Low (shared with personal data)
High (isolated)
High (sandboxed)
Maintenance
Manual
Manual (updates)
Minimal
Best For
Testing and development
Budget-friendly 24/7 use
User-friendly 24/7 operation
How to Keep OpenClaw Running 24/7
Choosing the right environment is only half the battle. Here’s how to maintain uptime in each scenario.
Keeping OpenClaw Running on a Local Windows PC
The biggest threat to uptime on a local machine is Windows sleep mode. Go to Settings → System → Power & Sleep and set both the screen and sleep timers to Never.
For protection against power outages, a UPS (Uninterruptible Power Supply) provides enough backup power to survive brief outages or perform a safe shutdown during longer ones [5]. Abrupt shutdowns can corrupt the gateway’s state.
To run OpenClaw as a persistent background service, use PM2 or NSSM (Non-Sucking Service Manager). PM2 setup:
This ensures the gateway restarts automatically if it crashes [3].
For smoother performance, add the npm cache folder (%AppData%\npm) and node.exe to Windows Defender‘s exclusion list to reduce scan overhead [7][9].
Keeping OpenClaw Running on a Linux VPS
On Linux, register OpenClaw as a systemd user service to start it automatically at boot and restart it after crashes. To keep it running after you log out, enable lingering for your user:
sudo loginctl enable-linger "$(whoami)"
“WSL2 remains the most Linux-compatible Gateway runtime on Windows… every feature the docs describe works exactly as written.” — OpenClaw Documentation [1]
If you’re using WSL2 on a VPS, the same linger command applies. Also ensure port 18789 is open in your cloud provider’s firewall so the gateway remains accessible.
Keeping OpenClaw Running on a Windows Cloud Desktop
A Windows cloud desktop stays online regardless of your local internet or power situation. Register the gateway as a Windows Scheduled Task so it starts automatically on boot:
openclaw gateway install
You can then manage everything remotely via RDP while OpenClaw runs in the background [1][7].
For added crash recovery, combine the Scheduled Task with PM2 [3]. Also set the Windows power plan to High Performance and disable sleep and hibernation to prevent default settings from disrupting the gateway.
On flexidesktop for automation and bots, the Plan S ($29/month, 2 vCPU, 4 GB RAM) handles basic automation, while Plan M ($39/month, 3 vCPU, 8 GB RAM) is better suited for heavier browser-automation workflows.
“Cron jobs are worthless if the process dies every time you close your laptop lid.” — Sawyer Ruhl, ComputerTech [3]
If you run into problems, use the diagnostic tool:
openclaw doctor
It checks for Node.js version mismatches, API key errors, network connectivity issues, and daemon status — resolving most Windows-specific concerns before you need to dig deeper [8].
Frequently Asked Questions
Do I need Administrator rights to install OpenClaw on Windows?
No. The standard install via the PowerShell script does not require Administrator rights. You run the installer in a regular PowerShell window. Admin rights are only needed if you want to register the gateway as a Windows Service (rather than a Scheduled Task).
How much RAM does OpenClaw need to run on Windows?
The minimum is 4 GB, but 8 GB is recommended for smooth day-to-day use. If you’re running local AI models alongside OpenClaw (instead of cloud-based providers), plan for at least 16 GB. For cloud desktop deployments, flexidesktop’s Plan S (4 GB) covers basic automations while Plan M (8 GB) handles browser-intensive workflows.
Can OpenClaw run 24/7 on a regular Windows PC?
Technically yes, but it requires manual effort: disabling sleep mode, optionally adding a UPS for power protection, and using a process manager like PM2 to auto-restart the gateway. In practice, most users who need reliable 24/7 uptime move to a Linux VPS or a Windows cloud desktop, where the environment is designed for continuous operation from the start.
What is the cheapest way to run OpenClaw 24/7?
A Linux VPS from providers like Hetzner or Contabo starts at around $5–$7/month and offers reliable uptime. This is the most cost-effective option if you’re comfortable with the command line and SSH. If you prefer a Windows environment, flexidesktop’s Plan S starts at $29/month and requires no Linux knowledge.
Why use a Windows cloud desktop instead of a Linux VPS for OpenClaw?
A Windows cloud desktop lets you use OpenClaw exactly as you would on a local PC — including the Windows Hub app, a graphical interface, and standard RDP access — without any Linux knowledge. It’s the right choice if you want 24/7 uptime but aren’t comfortable managing a Linux server. Both options are equally reliable; it comes down to familiarity and workflow preference.
Conclusion: Picking the Right Way to Run OpenClaw
The right deployment depends on your technical comfort, budget, and uptime requirements.
Your Situation
Best Option
Casual testing or non-critical tasks
Local Windows PC
Comfortable with Linux and on a budget
Linux VPS ($5–$29/month)
Need 24/7 uptime with a familiar Windows interface
Windows Cloud Desktop ($29–$39/month)
Prefer strong security with minimal setup
Windows Cloud Desktop
For most non-technical users who want OpenClaw running around the clock without managing a Linux server, a Windows cloud desktop is the practical choice. It stays online continuously, connects through a familiar desktop interface, and eliminates the hardware variables that make local setups unreliable.
Run OpenClaw 24/7 on a Windows Cloud Desktop.
Plan S from $29/month, Plan M from $39/month. No Linux required — connect via RDP and run OpenClaw just like on your own PC.
Israel de la Torre is the founder of flexidesktop and has spent 15+ years working in cloud infrastructure and Windows virtualization. He helps businesses migrate from on-premises Windows setups to managed cloud desktops.
Compare remote-access apps and cloud desktops to choose the right RDP alternative—use remote tools for occasional access or cloud PCs for always-on team work.
To provide the best experiences, we use technologies like cookies to store and/or access device information. Consenting to these technologies will allow us to process data such as browsing behavior or unique IDs on this site. Not consenting or withdrawing consent, may adversely affect certain features and functions.
Functional
Always active
The technical storage or access is strictly necessary for the legitimate purpose of enabling the use of a specific service explicitly requested by the subscriber or user, or for the sole purpose of carrying out the transmission of a communication over an electronic communications network.
Preferences
The technical storage or access is necessary for the legitimate purpose of storing preferences that are not requested by the subscriber or user.
Statistics
The technical storage or access that is used exclusively for statistical purposes.The technical storage or access that is used exclusively for anonymous statistical purposes. Without a subpoena, voluntary compliance on the part of your Internet Service Provider, or additional records from a third party, information stored or retrieved for this purpose alone cannot usually be used to identify you.
Marketing
The technical storage or access is required to create user profiles to send advertising, or to track the user on a website or across several websites for similar marketing purposes.