Welcome to your new flexidesktop Team! This guide will walk you through how to access your Team desktop, manage users, and connect via web or Remote Desktop.
If you haven’t purchased a flexidesktop Team plan yet, you can explore our plans here.
Step 1: Access Your Account
Once your order is complete, you’ll receive a confirmation email.
To access your flexidesktop Team, follow these steps:
Set your Dashboard password: For your first login, you’ll need to create a password for your customer dashboard. After your order is completed, you’ll receive an email with a link to set this password. (If you can’t find the email, please check your spam folder.)
Access your desktops: In the main menu, click “My Desktops”.
Forgot your password? You can easily reset it at any time by visiting this link.
Step 2: Find Your Team Desktop
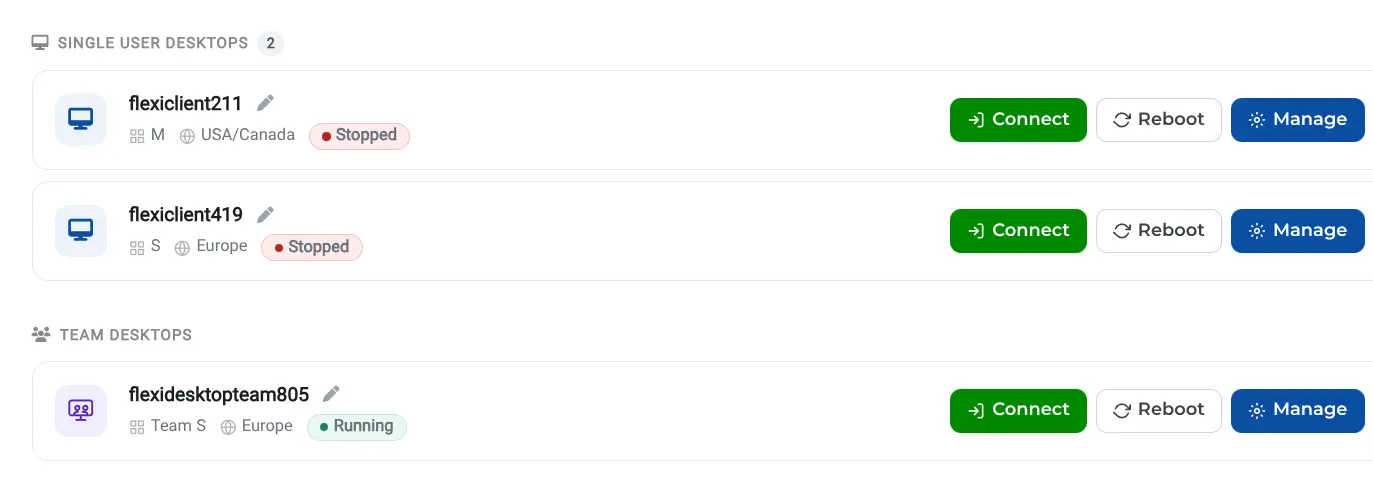
Inside My Desktops, scroll to the Team Desktops section.
You’ll see a list of your active flexidesktop Team subscriptions.
Click “Manage” next to the Team desktop you want to configure.
Step 3: Create and Manage Users
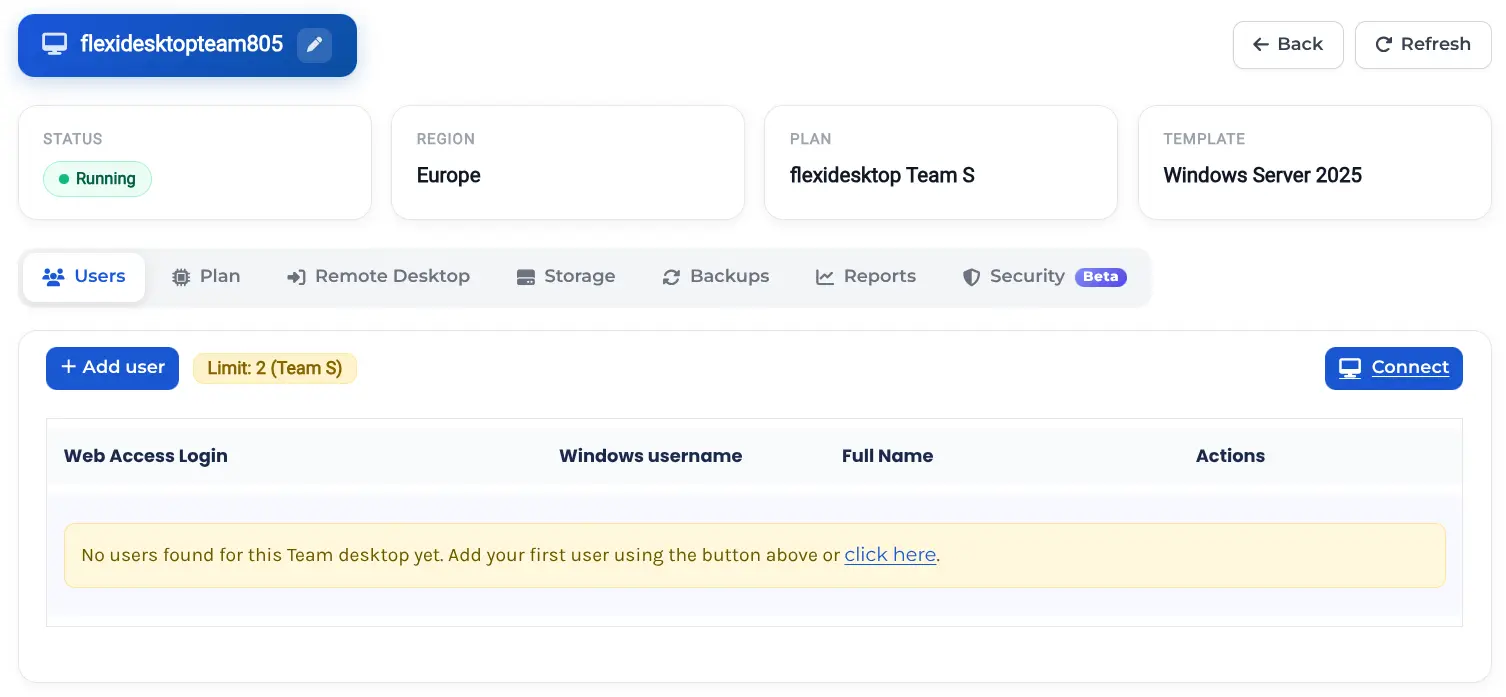
When you first sign up for flexidesktop Team, your virtual desktop is delivered without any users created by default. To get started, go to the Users tab and click on Add user:
Creating a New User
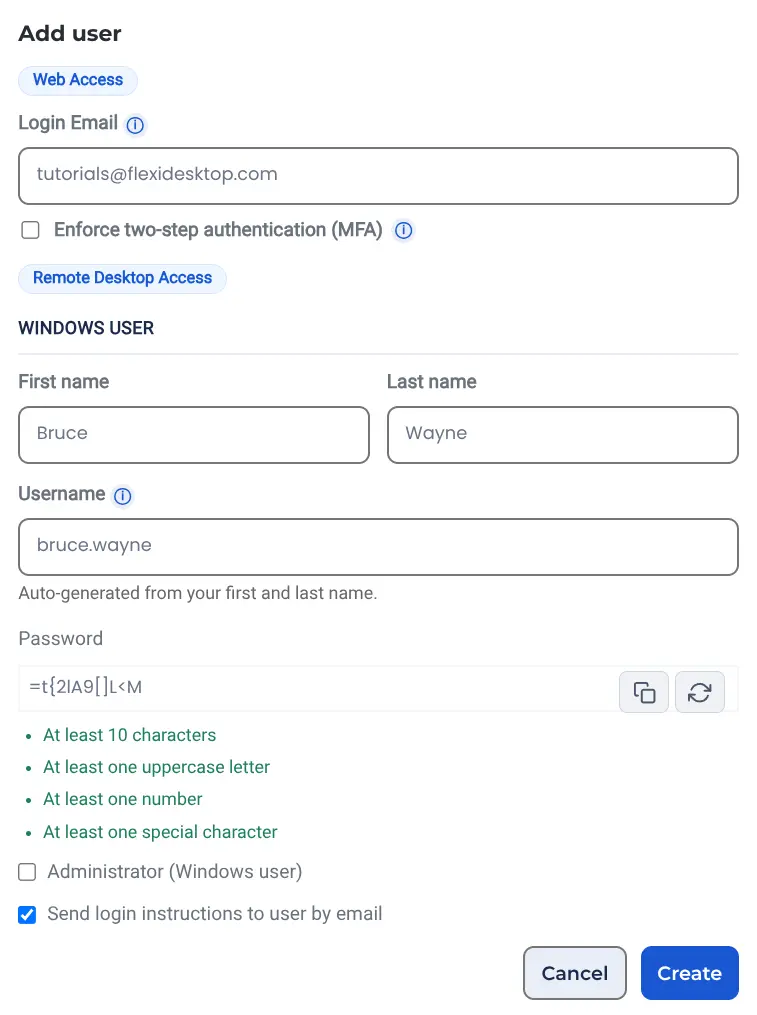
A popup window will appear where you must fill in the following fields:
Login Email This will be the web access login for this user.
First name & Last name These are the Windows user details. Based on these values, a Windows username will be automatically generated.
Password This password will be used for both Web access login + Windows user login. A secure password is generated automatically when you open the form — you can use it as-is, or click the refresh icon next to it to generate a new one.
Administrator (Windows user) If enabled, the user will have full administrator privileges on the virtual desktop. If disabled, the user will be created as a regular user with limited permissions (no software installation, no system changes, etc.).
Send login instructions to user by email Checked by default. When enabled, the user receives an email with their login URL, username, and password as soon as the account is created.
Once all fields are complete, click Create.
Editing a User
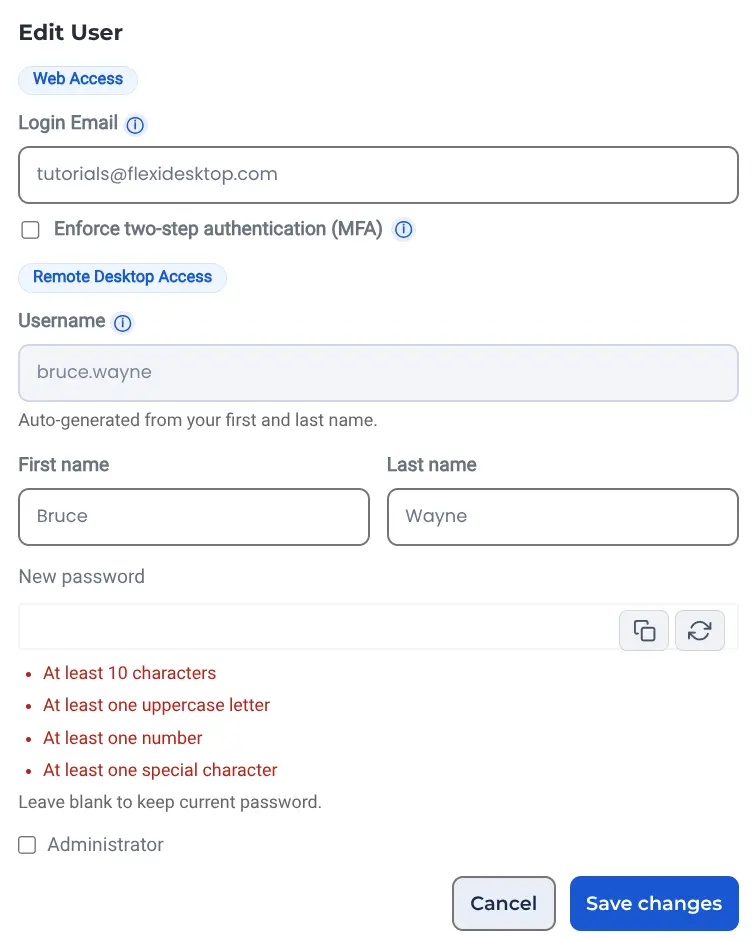
After a user is created, you can edit:
Web access email
First name and last name
Password
Administrator privileges
⚠️ The Windows username cannot be modified, as it is automatically generated and fixed.
Deleting a User
You can also delete any user you no longer need. ⚠️ Important: Once a user is deleted, their Windows profile and all associated files will be permanently lost, and recovery will not be possible.
User Limits
The maximum number of users you can create depends on your flexidesktop Team plan. Make sure you do not exceed your plan’s allowed user limit.
Step 4: Connect to Your flexidesktop (Web or Remote Desktop)
Connect via Web Browser
The Connect button opens your virtual desktop directly in the browser for the dashboard owner — the account you’re logged in with. For any other user (for example, one you just created), use the login page that corresponds to the datacenter where your flexidesktop is hosted:
Enter the web username and password for the user you want to connect as.
After logging in, you’ll land directly on your flexidesktop Team environment, already signed in as that Windows user.
Connect via Remote Desktop (Optional)
If you prefer to use the Microsoft Remote Desktop client, you can request Remote Desktop access from the “Remote Desktop” tab in the same page. Our team will enable the necessary configuration and send you the connection details. For the full step-by-step process, see How to Connect to a Remote Desktop Using a VPN.
Tip: For quick tasks and short sessions, accessing your flexidesktop Team via web browser is the fastest and easiest method. For regular daily use or longer sessions, we recommend connecting through Remote Desktop client for the best experience.
FAQ
Q: Can I manage users directly from Windows? A: User management must be done from the flexidesktop dashboard. From the Users tab you can create additional web users, create or edit Windows users, and assign administrator access. All changes are handled directly from the dashboard—no need to manage accounts from inside Windows.
Q: Can multiple users connect at the same time? A: Yes, as long as they use different Windows user accounts. If two people sign in using the same Windows username, the first session will be closed automatically.
Q: How do I request Remote Desktop access? A: Go to the Remote Desktop tab inside your flexidesktop Team dashboard and submit the request. Our team will prepare your connection details and notify you when it’s ready.
Q: Can I upgrade my flexidesktop Team plan later? A: Yes. You can upgrade anytime from your dashboard, and the additional CPU, RAM and users limit will be applied automatically within a few minutes—your data stays intact.
Q: How long does it take to process user changes? A: User updates are applied instantly. As soon as you create or edit a user in the dashboard, the change is applied in real time and the new credentials are ready to use.
Need Help?
If you have any questions or need assistance, feel free to contact our support team. We’re happy to help!
Get Started with flexidesktop Today!
Secure, flexible, and efficient virtual desktops at your fingertips.
Learn how to upload files from your physical computer to your flexidesktop cloud PC, and how to download files from your cloud PC back to your device — using the built-in Shared Drive in the web client.
To provide the best experiences, we use technologies like cookies to store and/or access device information. Consenting to these technologies will allow us to process data such as browsing behavior or unique IDs on this site. Not consenting or withdrawing consent, may adversely affect certain features and functions.
Functional
Always active
The technical storage or access is strictly necessary for the legitimate purpose of enabling the use of a specific service explicitly requested by the subscriber or user, or for the sole purpose of carrying out the transmission of a communication over an electronic communications network.
Preferences
The technical storage or access is necessary for the legitimate purpose of storing preferences that are not requested by the subscriber or user.
Statistics
The technical storage or access that is used exclusively for statistical purposes.The technical storage or access that is used exclusively for anonymous statistical purposes. Without a subpoena, voluntary compliance on the part of your Internet Service Provider, or additional records from a third party, information stored or retrieved for this purpose alone cannot usually be used to identify you.
Marketing
The technical storage or access is required to create user profiles to send advertising, or to track the user on a website or across several websites for similar marketing purposes.
To provide the best experiences, we use technologies like cookies to store and/or access device information. Consenting to these technologies will allow us to process data such as browsing behavior or unique IDs on this site. Not consenting or withdrawing consent, may adversely affect certain features and functions.
Functional
Always active
The technical storage or access is strictly necessary for the legitimate purpose of enabling the use of a specific service explicitly requested by the subscriber or user, or for the sole purpose of carrying out the transmission of a communication over an electronic communications network.
Preferences
The technical storage or access is necessary for the legitimate purpose of storing preferences that are not requested by the subscriber or user.
Statistics
The technical storage or access that is used exclusively for statistical purposes.The technical storage or access that is used exclusively for anonymous statistical purposes. Without a subpoena, voluntary compliance on the part of your Internet Service Provider, or additional records from a third party, information stored or retrieved for this purpose alone cannot usually be used to identify you.
Marketing
The technical storage or access is required to create user profiles to send advertising, or to track the user on a website or across several websites for similar marketing purposes.